Write a Good Dockerfile in 19 'Easy' Steps
(update: also see my post on Writing a Good Dockerfile in 0 Steps)
In this post you’ll learn the essential steps required to write a secure, compact, and maintainable Dockerfile in just 19 “easy” steps. I think you’ll be surprised at how much you really need to know. Let’s get started!
Step 1: Check the order of your commands
The order of commands in a Dockerfile determines when a command’s cache is invalidated. Changing files or modifying lines in the Dockerfile will break subsequent steps of the cache. You must order your commands from least to most frequently changing steps to optimize your Dockerfile caching.

In this example, we’ve moved the COPY command after the RUN commands to ensure that we don’t bust the apt cache each time our app changes.
Step 2: Use specific COPY commands to limit cache busting
Wait, there’s more. The COPY command should be more specific than the previous example. When copying files into your image, make sure you are very specific about what you want to copy. Any changes to the files being copied will break the cache. In the example above, only the pre-built JAR file is needed inside the image and so only it needs to be copied.

In this way unrelated file changes will not affect the cache.
Step 3: Use “line buddies” to make sure you’re not installing older versions of packages
Dockerfile caching can be dangerous when used the wrong way. Try to combine related RUN commands to ensure they are cached as a unit. The most common are apt-get or yum install commands. When installing packages from package managers, you always want to update the index and install packages in the same RUN: together they form one cacheable unit. Otherwise you risk installing outdated packages.

Step 4: Don’t use too many line buddies or you’ll bust the cache too often
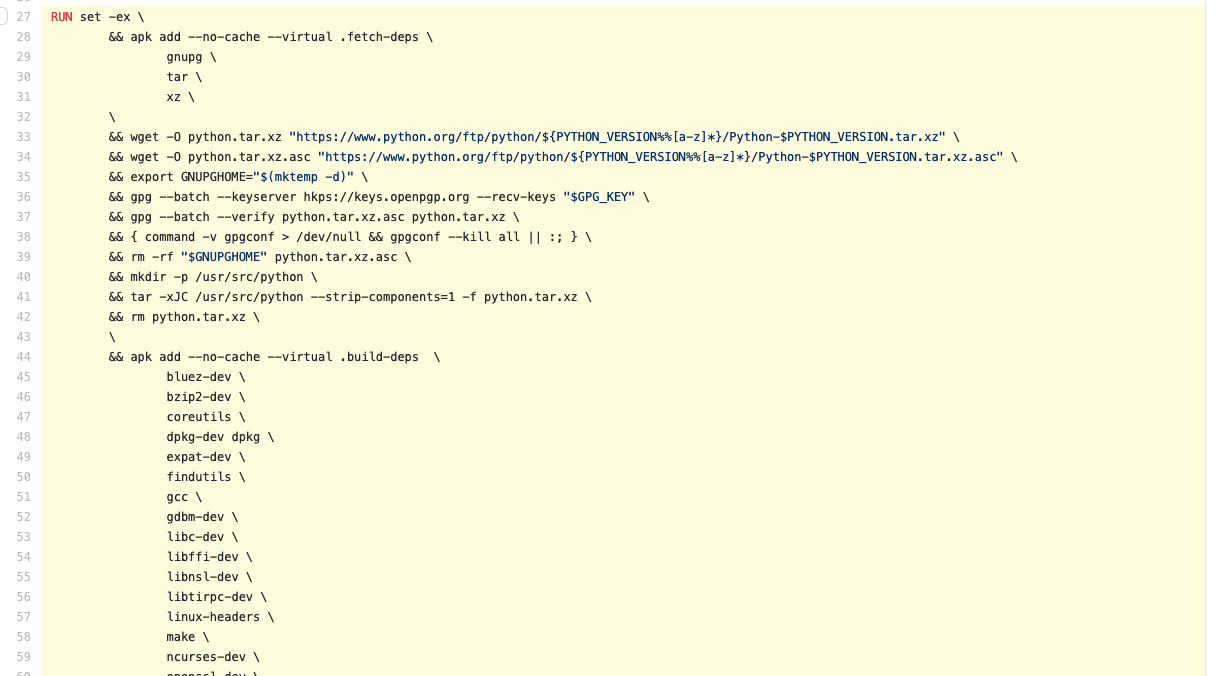
Be careful though. Too many line buddies (i.e. chaining all commands into one RUN instruction) can bust the cache easily, hurting the development cycle. In the worst cases, you end up with RUN commands like this 114 line example from the official Python image on Docker Hub (however, this example is unavoidable because all the steps need to be one cacheable unit).

Speaking of official images…
Step 5: Use official images when possible
Official images can save a lot of time spent on maintenance because all the installation steps are done for you and best practices are applied. If you have multiple projects, they can share those layers because they use exactly the same base image.

But the openjdk image isn’t really “official”…
Step 6: Actually, not all official images are equal
According to Snyk, the most popular images on Docker Hub are riddled with vulnerabilities. And in some cases, like the OpenJDK “mystery meat” incident, they don’t contain what they advertise. Let’s revert to the official Debian image.

For those who are really concerned about trusting third-party software, there’s another option.
Step 7: Build your image from scratch
If you really care about security, you shouldn’t depend on third-party images at all. You should build all of your production images from scratch. Most companies that do this employ a team to maintain a set of base images that are containers that run in production.
Creating images from scratch is tricky, and doesn’t always work for certain languages and toolchains. For that reason I won’t cover it here. We’ll keep using the official Debian image, but you need to keep this in consideration for each app you work on.
Step 8: Use specific tags
Before we get back to your package manager: do not use the latest tag, which is equivalent to not using a tag. It has the convenience of always being available for images but it can introduce breaking changes over time. It can cause a build to fail depending on how far apart in time you rebuild the Dockerfile without cache.

Step 9: Use even more specific tags
Whoops, buster is actually still a mutable tag. You can be even more specific:

This will ensure that you don’t accidentally pick up any changes, which means your builds are fully reproducible. On the other hand, such a specific tag prevents you from automatically picking up critical CVE patches the next time you rebuild. This is a trade-off you’re going to have to juggle and decide what’s best for you.
Step 10: Remove the package manager cache
Let’s get back to package managers. Make sure you clean up after them.
Package managers maintain their own cache which may end up in the image. One way to avoid this is to remove the cache in the same RUN instruction that installed packages. Removing it in another RUN instruction would not reduce the image size.

This is one reason the Python image has such a large RUN command.
Step 11: Build from source in a consistent environment
Thus far, we’ve only demonstrated how a JAR file built outside of a container can be added to an image. But in most environments, you’ll want a container image to build the JAR too.
I don’t want to distract from this post to show you how to build a Maven image, so I’m going to violate my own advice again and use the official Maven image from Docker Hub.

Step 12: Fetch dependencies in a separate step
You don’t want a change to a simple configuration file to bust your dependency cache, so it’s best to decouple the installation of dependencies from the rest of the build. I call this “Dockerfile gymnastics”:

Unfortunately, a change to the authors in your pom.xml will still invalidate the cache. Sorry, there’s no good way around this.
Step 13: Use multi-stage builds to remove build dependencies
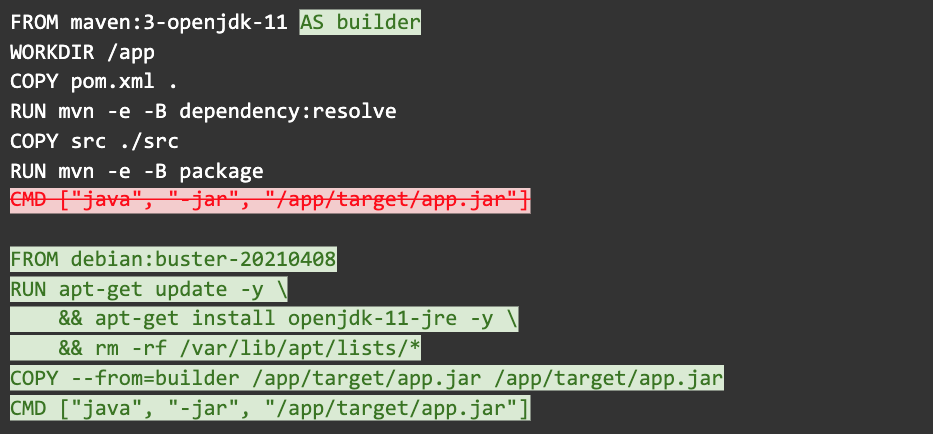
The previous example retained the Maven cache, and Maven itself in the final image. We can avoid that by using multi-stage builds. Multi-stage builds are recognizable by the multiple FROM statements. Each FROM starts a new stage. They can be named with the AS keyword which we use to name our first stage “builder” to be referenced later. It will include all our build dependencies in a consistent environment.

Make sure you pick compatible base images for each stage. It is possible to mix images that produce a final image that won’t run correctly.
Multi-stage builds have their limitations, too. They can’t recursively copy files, they can’t copy patterns, and they can’t rely on the environment (such as env vars or users) being copied over to the new image.
Step 14: Copy and paste this file into every repo where you need it
Look at all the things you had to learn to write a good Dockerfile. Do you feel enriched?
The next time you need to turn a Java app into a Docker image, you can copy and paste this file into every repo where you need it. Unfortunately, you’ll probably need to change everyone of them at some point.
Step 15: Update every one of those Dockerfiles because there’s a new version of a dependency
Make sure you update those copy and pasted Dockerfiles when there are critical CVEs for any of the packages and components in the image!
Step 16: Make changes to accommodate concerns that are unique to each app
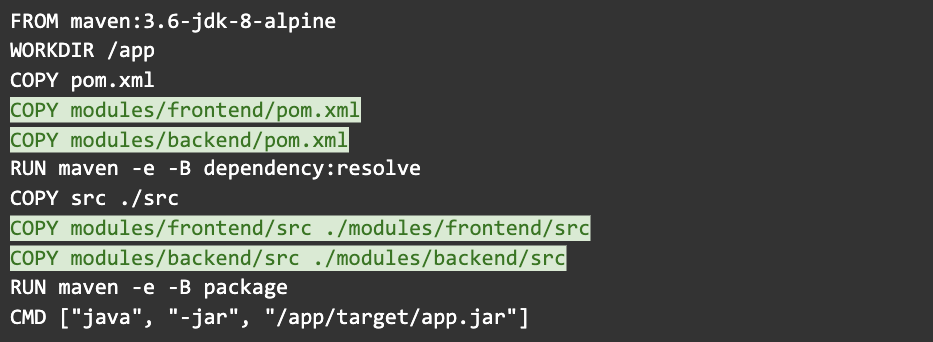
Very often, your applications won’t be exactly the same. For example, it’s common for Java apps to have multiple modules. You’ll have to accommodate these individually in each Dockerfile you create.

Hopefully you didn’t forget anything.
Step 17: Use templating to reduce redundancies across repos
There are many options for templating your Dockerfiles that reduce the amount of copy/pasting you do. I’m sure you’ll enjoy learning about the nuances and tradeoffs of those tools and patterns. But at the end of the day, you’ll still have image configuration propagated throughout every repo you maintain, and you’ll need to run some process to update it.
Step 18: Learn new idiosyncrasies for other languages
There are special steps you’ll need to consider when dealing with NPM’s devDependencies, Ruby’s Gemfile.lock, and of course Python dependency management. That’s the subject of several other blog posts you’ll have to scour the internet looking for.
Step 19: Use Cloud Native Buildpacks to patch the OS in milliseconds
Next time, you can avoid all of the steps you just learned by installing the Pack CLI and running:
$ pack build --builder heroku/buildpacks:20 my-app
Or with Spring Boot, you can run the following command (which uses the Paketo Buildpacks):
$ ./mvnw spring-boot:build-image
Both of these commands will create a Docker image that’s tailored to your app (and the language it’s written in) without the need for a Dockerfile.
Then, when the inevitable day comes where the Operating System needs updating, you can create a new image in milliseconds without rebuilding your app, reinstalling the JDK, or re-downloading your dependencies by using the Buildpacks rebase feature:
$ pack rebase my-app:my-tag
Most of the steps in the blog post mimic the steps in the post Intro Guide to Dockerfile Best Practices by Tibor Vass, but I don’t want this to come across as an insult to Tibor. His guide is an excellent and important introduction for individuals who really need to write a Dockerfile. I am of the opinion, however, that most people should not need to write a Dockerfile.