Using Database-backed RESTful Services on Heroku with Android
In my last post, you learned how to invoke a service from an Android app with Retrofit. Now you’ll extend that example to consume RESTful JSON-based services that are backed by a database on the server.
Creating the Services and Database
You can build a RESTful database-backed API with any of the frameworks referenced in the previous post. Pick the framework you’d prefer from the list below. Then deploy the example REST app for free on Heroku–with a database–by clicking the button that follows it:
-
Spring Boot: This app extends the previous example by adding a
Bookmodel class, which has a singleisbnfield. There’s also aBookControllerclass that provides a RESTful API for the Book models. (code) -
Wildfly Swarm: This app extends the previous example by adding a JPA based
Bookmodel class, which has a singleisbnfield. There’s also aBookEndpointclass that uses JAX-RS to provide a RESTful API for the Book models. (code) -
Ratpack: This example is the most complicated of the bunch, but also the most powerful. It adds a
Bookmodel Groovy class, as well as several other classes that support the RESTful endpoints and database mappings. All of these components use RxJava and Netflix Hystrix to provide fault tolerance, reduced latency, and increased responsiveness. (code)
When you deploy your REST app, Heroku will provision a PostgreSQL database for you, and the app will generate it’s tables at startup. When the deploy is finished, you’re ready to implement the client.
Consuming the Services from Android
You can begin by either creating a new project in Android Studio or cloning my sample application from Github. If you want to see the completed code for this tutorial, run git checkout -t origin/db to clone the db branch of the repo (or you can browse the complete code).
As with the previous post, you’ll need to give your app permission to access the internet. Open AndroidManifest.xml and add this tag before the <application> tag:
<uses-permission android:name="android.permission.INTERNET"/>
You’ll consume the RESTful services with Retrofit again, but this time they’ll return a response in JSON format instead of a simple String. To parse the response, you’ll include both Retrofit and Gson (a Google API for parsing JSON) in the dependencies section of your build.gradle (Module: app) file:
compile 'com.google.code.gson:gson:2.6.2'
compile 'com.squareup.retrofit2:retrofit:2.1.0'
compile 'com.squareup.retrofit2:converter-gson:2.1.0'
Now you can add a few elements to the MainActivity view that will allow you to trigger the RESTful services. Replace the code in the <RelativeLayout> section of your project’s activity_main.xml with the following code:
<EditText
    android:layout_width="match_parent"
    android:layout_height="wrap_content"
    android:id="@+id/isbnInput"
    android:hint="ISBN:"/>

<Button
    android:text="Create"
    android:layout_width="wrap_content"
    android:layout_height="wrap_content"
    android:layout_below="@+id/isbnInput"
    android:id="@+id/button" />

<TextView
    android:layout_width="wrap_content"
    android:layout_height="wrap_content"
    android:text="Click the button to create a book"
    android:layout_below="@+id/button"
    android:id="@+id/textView" />
This defines a text entry field for the ISBN of a new book, a create button, and a text view to display the result of the service invocation.
Now wire up the view elements in the MainActivity class by adding the following code to the end of the onCreate method in the MainActivity.java file:
final EditText isbnInput = (EditText) findViewById(R.id.isbnInput);
final TextView textView = (TextView) findViewById(R.id.textView);
final Button button = (Button) findViewById(R.id.button);
Invoking a POST Service
The first service you’ll consume is a POST service that creates a new book. The input to the service is JSON, and its response will be JSON. Instead of building up the JSON payload manually, you’ll use a serializable Java class, which represents the book you are creating.
Create a Book class in your Android app and put this code in it.
import com.google.gson.annotations.SerializedName;

public class Book {

    @SerializedName("id")
    int id;

    @SerializedName("isbn")
    String isbn;

    public Book(int id, String isbn) {
        this.id = id;
        this.isbn = isbn;
    }

    public Book(String isbn) {
        this.isbn = isbn;
    }
}
The Book class matches the structure of the Book model on the server. It also uses the Gson @SerializedName annotation, which will automatically convert the object to and from JSON.
Now you’ll create a class to represent the client interface to the remote service. Right-click on your primary package in Android Studio, then select “New -> Java Class” and create a new Interface called BookService. Then put the following code in the file:
import java.util.List;
import retrofit2.Call;
import retrofit2.http.Body;
import retrofit2.http.GET;
import retrofit2.http.POST;
import retrofit2.http.Path;

public interface BookService {
    @GET("books")
    Call<List<Book>> all();

    @GET("books/{isbn}")
    Call<Book> get(@Path("isbn") String isbn);

    @POST("books/new")
    Call<Book> create(@Body Book book);
}
The service has three endpoints: one to get a list of all books, one get a single book, and one to create a new book.
Now you can use the class with Retrofit to make the service call. Return to the MainActivity class and add the following code to the end of the onCreate method:
Retrofit retrofit = new Retrofit.Builder()
        .baseUrl("https://<yourapp>.herokuapp.com")
        .addConverterFactory(GsonConverterFactory.create())
        .build();

final BookService service = retrofit.create(BookService.class);
In the URL string, replace <yourapp> with the name of the Heroku app you deployed earlier. The GsonConverterFactory will convert the JSON strings used by the REST services into Book objects using the annotations.
Now add an OnClickListener to the button element by adding the following code after after the Retrofit setup:
button.setOnClickListener(new View.OnClickListener() {
  @Override
  public void onClick(View v) {
    Book book = new Book(isbnInput.getText().toString());
    Call<Book> createCall = service.create(book);
    createCall.enqueue(new Callback<Book>() {
      @Override
      public void onResponse(Call<Book> _, Response<Book> resp) {
        Book newBook = resp.body();
        textView.setText("Created Book with ISBN: " + newBook.isbn);
      }

      @Override
      public void onFailure(Call<Book> _, Throwable t) {
        t.printStackTrace();
        textView.setText(t.getMessage());
      }
    });
  }
});
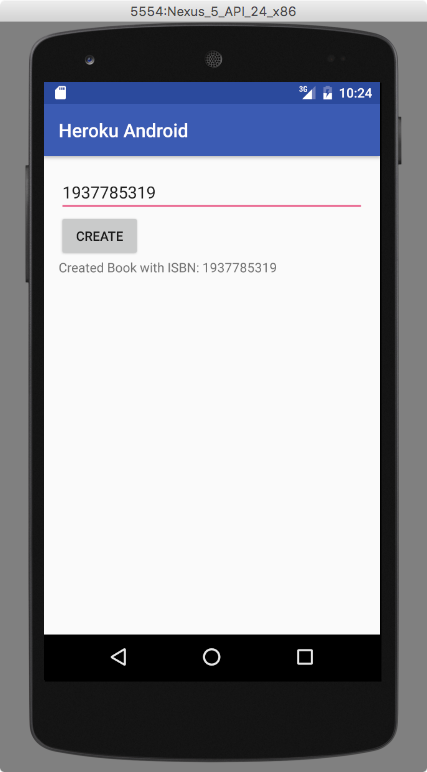
When the button is clicked, it will create a new Book object from the ISBN value in the text field. Then it will call service.create(book) with the Book object acting as a template for a new book that will be created in the database.
When the client receives a response, it will display a confirmation in the text field.
Run the app in your emulator or connected device. Enter an ISBN and click the create button. This is what you’ll see:
Invoking a GET Service
Now you’ll add another button to the Android app that will retrieve all the books on the server and display their ISBN values in the app. Open the activity_main.xml and add the following code after the TextView:
<Button
    android:text="View All"
    android:layout_width="wrap_content"
    android:layout_height="wrap_content"
    android:layout_marginTop="24dp"
    android:layout_below="@+id/textView"
    android:id="@+id/viewAllButton" />

<TextView
    android:layout_width="wrap_content"
    android:layout_height="wrap_content"
    android:text=""
    android:layout_below="@+id/viewAllButton"
    android:id="@+id/allBooks" />
The View All button will make the request to retrive all books, and the allBooks text view will display them.
Now wire up the new elements in MainActivity by adding this code to the end of the onCreate method:
final Button viewAllButton = (Button) findViewById(R.id.viewAllButton);
final TextView allBooks = (TextView) findViewById(R.id.allBooks);
You won’t need to change your Book or BookService classes. They’re already prepared to handle the GET requests. You only need to wire up the viewAllButton to make the request. Add this code to the end of the onCreate method (after the code you just added):
viewAllButton.setOnClickListener(new View.OnClickListener() {
  @Override
  public void onClick(View v) {
    Call<List<Book>> createCall = service.all();
    createCall.enqueue(new Callback<List<Book>>() {
      @Override
      public void onResponse(Call<List<Book>> _, Response<List<Book>> resp) {
        allBooks.setText("ALL BOOKS by ISBN:\n");
        for (Book b : resp.body()) {
            allBooks.append(b.isbn + "\n");
        }
      }

      @Override
      public void onFailure(Call<List<Book>> _, Throwable t) {
        t.printStackTrace();
        allBooks.setText(t.getMessage());
      }
    });
  }
});
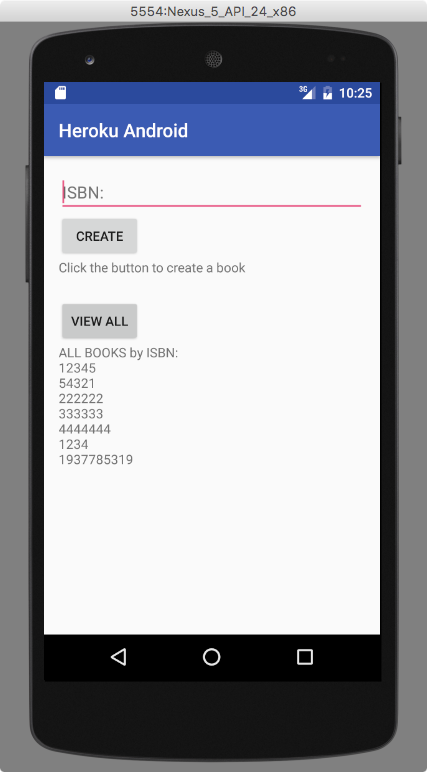
In this callback, you’re invoking service.all(), which will return a list of books from the server. Then you’re displaying that list in the allBooks view.
Run the app in your emulator or connected device again. Create a few more books, and then click the “View All” button. This is what you’ll see:
Next Steps
The next big step for this app is adding authentication and authorization to the Heroku service. We’ll look at that in the next post.