Managing Users in an Android App with Stormpath and Heroku
In the previous post, you learned how to add a database to your backend service and consume it with Retrofit in an Android app. But you exposed the services without any authentication or authorization. In this post, you’ll learn how to protected those services and add a complete user mangement system to your app with Stormpath.
Creating the User Management System
You can use Stormpath with any of the frameworks referenced in the previous post, but this tutorial will use Spring Boot exclusively. You can deploy the example REST app for free on Heroku—with a database and Stormpath service—by clicking this button:
When you deploy the app, Heroku will provision a PostgreSQL database for you (as in the previous example) and create a free Stormpath account you can use immediately (although you may have to provide a credit card for verification purposes).
When the deploy is finished, click the “View App” button, which will take you to a registration page. Create a new account and make note of the email and password you used—you’ll need them in the Android client.
The registration page was automatically added to the Spring Boot app simply by adding the following library to the dependencies section of the app’s build.gradle file:
compile 'com.stormpath.spring:stormpath-default-spring-boot-starter:1.2.2'
This library uses the STORMPATH_* environment variables created by the Stormpath add-on to connect your app to the Stormpath server. Stormpath will handle all aspects of user management for you, which means there’s less chance of a bug in your code accidently exposing your customer’s private data to attackers. In my opinion, it is always safer to rely on a third-party service for security instead of trying to do it yourself (because you most likely won’t get it right).
You can see exactly how the authentication branch of the code differs from the previous article’s code by browsing this diff on Github.
Authenticating from Android
For the client-side part of this tutorial, it’s best to start with your code from the previous article or clone my sample application from Github. If you want to see the completed code for this tutorial, run git checkout -t origin/auth to clone the auth branch of the repo (or you can browse the finished code on Github).
You’ll consume the RESTful services with Retrofit again, but this time the endpoints will require authentication before you can access them. To authenticate your Android app with the server, you’ll need to include com.stormpath.sdk:stormpath-sdk-android:2.0 in the dependencies section of your build.gradle (Module: app) file along with the other dependencies:
compile 'com.stormpath.sdk:stormpath-sdk-android:2.0'
Now you can add the initial authorization code in the onCreate method of the MainActivity class (but replace the baseUrl with the URL of your Heroku app, and the username and password with the ones you created earlier):
String baseUrl = "https://limitless-inlet-33234.herokuapp.com";
StormpathConfiguration stormpathConfiguration =
  new StormpathConfiguration.Builder()
    .baseUrl(baseUrl)
    .build();
Stormpath.init(this, stormpathConfiguration);

Stormpath.login("foo@bar.com", "Pa55word", new StormpathCallback<Void>() {
  @Override
  public void onSuccess(Void aVoid) { }

  @Override
  public void onFailure(StormpathError error) { }
});
This code will authenticate your Android client and generate an OAuth token, which you can access by calling
Stormpath.getAccessToken(). This token must be provided as part of an Authorization header for every request you make to the /books services. To do this, you’ll need to add an Interceptor to the Retrofit client. Add this code to the onCreate method after the Stormpath initialization:
OkHttpClient httpClient = new OkHttpClient.Builder()
  .addInterceptor(new Interceptor() {
    @Override
    public okhttp3.Response intercept(Chain chain) throws IOException {
      Request.Builder ongoing = chain.request().newBuilder();
      ongoing.addHeader("Accept", "application/json");
      ongoing.addHeader("Authorization", "Bearer "+Stormpath.getAccessToken());
      return chain.proceed(ongoing.build());
    }
  }).build();

Retrofit retrofit = new Retrofit.Builder()
  .baseUrl(baseUrl)
  .addConverterFactory(GsonConverterFactory.create())
  .client(httpClient)
  .build();
Run the app in your emulator or connected device again. Create a few more books, and then click the “View All” button. This is what you’ll see:
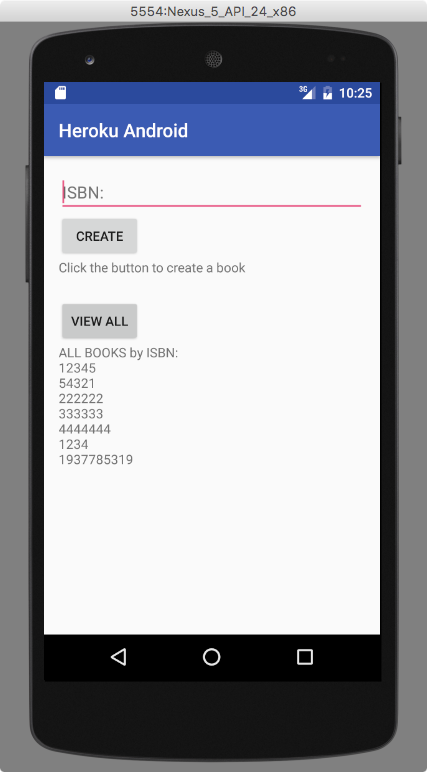
Everything should work exactly as it did before. If you get any kind of error, it means that your client failed to authenticate with the server. You can check the Stormpath documentation for help debugging if you have problems.
Next Steps
The example authentication code presented here is rather contrived. You’ll probably want to add a form to your Android app that allows users to register themselves from their device and log in their own username and password. For a more complete guide, see the Stormpath tutorial on how to Build an Android Application with Secure User Authentication.